This guide is not only for programmers, designers but also for people who wants to make their own applications and earn money from them. After reading you will be able to made new clockfaces even if you had no programming or 3D modelling knowledges (you must have some knowledges in Adobe Photoshop and some skills of working with 3D editor). I give you a unique chance – create your unique clocks as application-plugin.
This work required:
- Download and install Android Studio – for building your application-plugin
- Adobe Photoshop – for creating textures and layout of clockface
- 3D editor with ability .obj format export. In this article I will refer Autodesk Maya 3D and I provide a special script for importing from Adobe Photoshop, so I recommend to use it as a 3D editor.
- Download a clockfaces demo-project of plugins from this link.
- Download scripts for Photoshop and Maya 3D from link and insert their contents to folder paths like their folder names and “Photoshop” and “Maya 3D” paths. Paths of folders in your PC may be a little different.
Creating the clockface texture
Let’s start with the creation of the clockface. I’m recommend to make one texture 1024×1024 pixels, but there may be other dimensions also which are the multiple of a power of 2 (256×256, 512×512, 2048×2048 for example). Clocks are making with transparent background and after they are saved as a png file it can be used later for getting the transparency mask, this process is described below.
The 3D object of the clockface is created from Adobe Photoshop layers therefore for each part of the object separate layer is necessary. It must have a unique name limited by listed below:
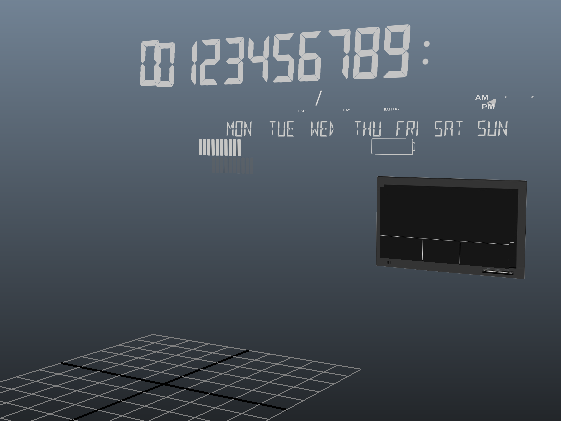
clockface – clockface
alarm – alarm clock button
battery – battery indicator (icon image)
bat_lvl_gen – indicator of background divisions of battery level. Its position depends on position of bat_lvl. For true data its size must be the same as bat_lvl size.
bat_lvl – indicator of divisions of battery level. It must be placed in the center of worldspace in 3D editor for true displaying of battery level. It could be all over the line (without divisions) but accuracy in the main program is 10% so it would be separated to 10 divisions.
week – day of the week
week_gen – if it will be in the object it shows the background line of all days of the week and week is moved along this line starting from monday, from left to right. Length of the moving depends on the width of the week or texture width of the week in this case. week saves its position if week_gen would not be in the object.
am – AM time indicator
pm – PM time indicator
am_pm_gen – if it will be in the object it shows the background part of AM/PM
md – MONTH/DAY layer of the date caption
There are some notations for displaying digits of the time and date listed below. For example if the time is represented by a 12:34:56 string which corresponds to hh:mm:ss so it is would be:
h1 – 1, h2– 2, m1 – 3, m2 – 4, s1 – 5, s2 – 6, dt1 – first colon, dt2 – second colon.
For date displaying: if the date is represented by 01/23 which corresponds to MONTH/DAY so it is would be:
mon1 – 0, mon2– 1, day1– 2, day2– 3, date_del – / delimeter.
Digits positions are not depends on each other. Initial texture coordinates must be placed to coordinates of zero digit.Texture’s horisontal translation for digit’s changing is equal to texture width of the h1 part.
Digits line should look like 0123456789, in other words starting from 0.
Layer or group of layers could be made invisible to exclude them from 3D scene and prevent from creating an extra elements.
Layers in 3D scene are placed in order so the last layer in Photoshop is the farthest in 3D (clockface).
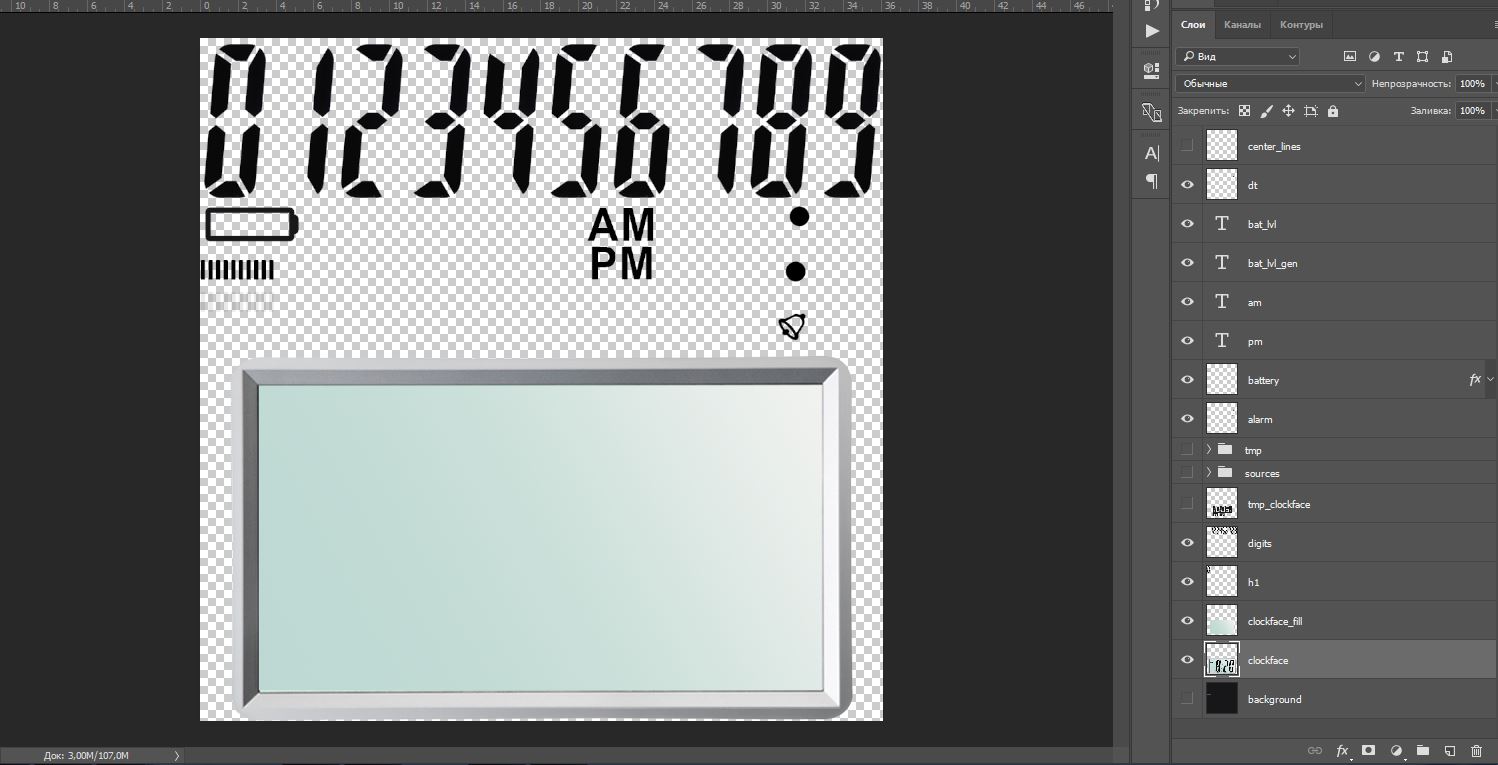
Clockface project example
Export from Photoshop
After creating all necessary layers you must export them using downloaded script which you must put into photoshop scripts folder. Go to the menu File > Scripts > Export in Maya 3D with one texture and press “run” to launch it.

После обработки слоёв появится сообщение об успешном выполнении скрипта, жмём ОК.
Скрипт создаёт папку с именем textures по умолчанию в каталоге с файлом сохранённого проекта Photoshop. Путь к этой папке потом необходимо указать при выполнении скрипта в Maya.
After it completes succesfully press OK.
Script creates folder with textures name in the folder where the Photoshop project was saved, as a default. You need to enter the path to this created folder when Maya script executing.
Import in Maya 3D
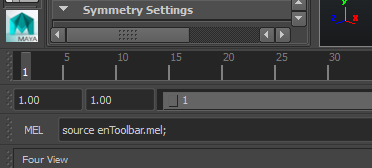
After exporting from Photoshop, you need to perform the import in Maya,since this is only intermediate data. Open Maya 3D and at the bottom of the main application window in the line with the name MEL enter source enToolbar.mel; and press Enter.
In the window that appears, enter the name-identifier of the clockface – only Latin letters and underscores without spaces and press Enter again.
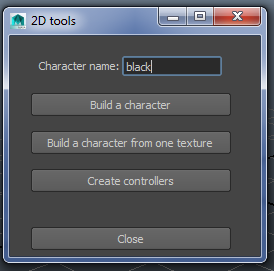
Press the button «Build a character from one texture» and specify textures folder which was created by Photoshop script.
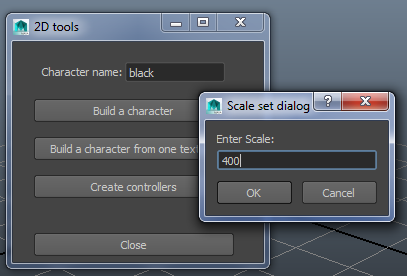
In the window that appears, enter the scale. For Battery Saving Clocks it is near 400 with correcting. Enter 400 and press Enter.
Close the window «2D Tools». Press on the icon «textured» and see your 3D object.
 |
 |
Press FRONT in the view cube in the view field and go to View > Camera Settings > disable checkbox Perspective.

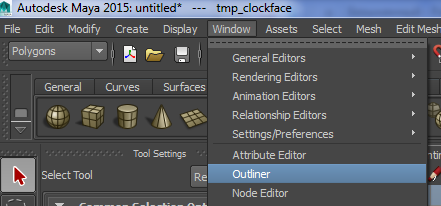
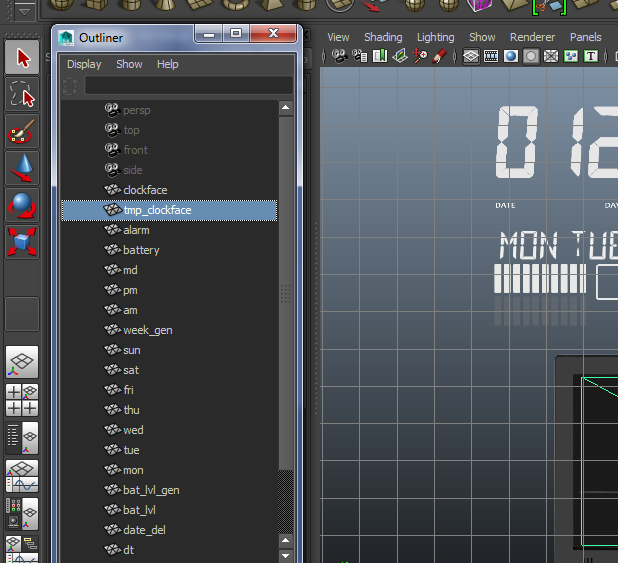
Go to Window and open Outliner to see all parts and be able to change the drawing priorities of our layers.
You can drag elements by mouse wheel and change their order. It is important for drawing order in clocks application. You can drag groups of objects. Selecting element in Outliner you select a scene object also. Objects in Outliner can be renamed by double click.
All the groups of objects (layers with names) can be moved, rotated, scaled by tools in the left panel area. Clockface must be placed in the center of worldspace (0;0;0). All the groups of objects should not be nearer than 1.0 along z axis, otherwise they will not be visible in the application.
Some useful hotkeys:
Ctrl+D – duplicate, working in moving, rotating and scaling modes.
The D key switches to moving the center of transforming mode.
After scene was created you are able to export in obj format. Press the File > Export All…

The view of completed project. Pay attention to the position of the battery level indicator
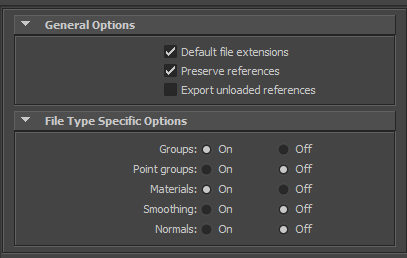
Set checkboxes as in the picture below, enter name-identifier of the clockface and press Export All.
Additional preparing of the clockface
To reduce the size of clockface I use 2 jpg files instead of one png, first is the texture and second – transparency mask. To make the mask file from png you need to open it in Photoshop, go to «Layers» >«Channels», press on the drop down menu button and select «Split channels».
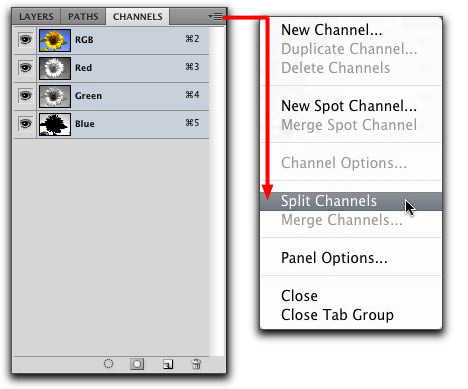
Last of the opened files which name includes “transparency” you need to save as jpg with the same name as png file with «_mask» addition. Other files should be closed without saving.
To ensure that the edges of the elements in the main jpg file are not of a different color than each of the elements I usually add a suitable background to each element (you can see it in the demo project).
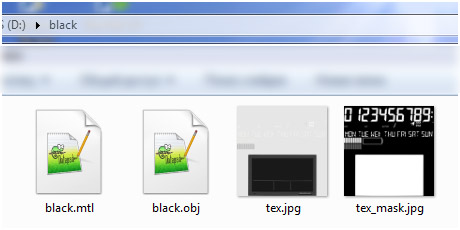
Now open the exported mtl file and replace the extension in the name of texture from png to jpg in it.
Move 4 files: obj, mtl, texture and texture mask in the folder with the same name as obj. file as in the picture below. You can also look in the example project.
Building the application
Clockface is completed, you need only to build the application from it. Extract the previously downloaded demo-plugin project, go to app\src folder and duplicate digitalBlack or digitalSimpleWhite.
Rename it to your name without spaces, newPlugin for example, go into it and into assets\textures\packs and insert the previously prepared folder.
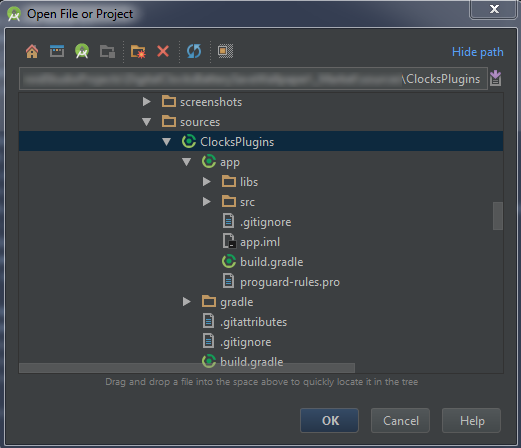
Open previously downloaded and installed Android Studio, go to File > Open… and choose the project folder.
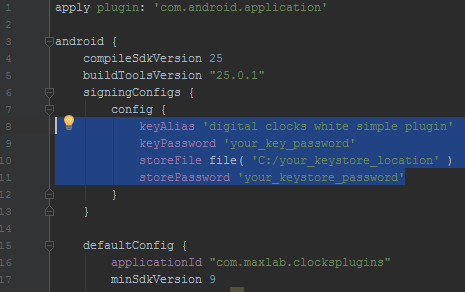
Open project file build.gradle (Module:app), duplicate digitalBlack {…} with the braces content and insert after it. Rename digitalBlack to newPlugin which same as our folder name. This is a plugin project variant.

Leave applicationId com.maxlab.bsclocks.plugins.digital. and add your own. I recommend the view of “developer_name.plugin_name” as in the picture above to make your id different to others.
Fill data of signing information. If you had no key stores you should create it and create your key also for digital signing your clockface application. Read more from the official website https://developer.android.com/studio/publish/app-signing.html.
Duplicate the line for signing the new plugin and replace digitalBlack to newPlugin:

Select newPluginDebug or newPluginRelease from BuildVariants as in the picture below. Now open files strings.xml for different languages (selected in the picture). You can add your own locales.

You should change 2 parameters – the app_name and clockface name inside the main application. By the way there can be several clockfaces, you need to specify your name for everyone.

Rename black to your clockface name which is the same as obj file and folder name and write an adequate name content which will be visible in clockfaces choosing in the main clocks application.
Do the same with localized strings.xml.
At last you need to prepare the icon for the application. To made this easy you should go to res\mipmap, press right mouse button and in the drop-down menu choose New > Image Asset.
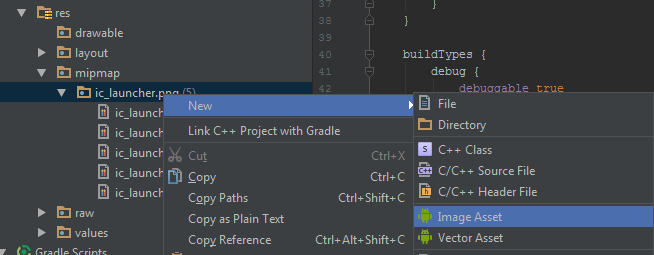
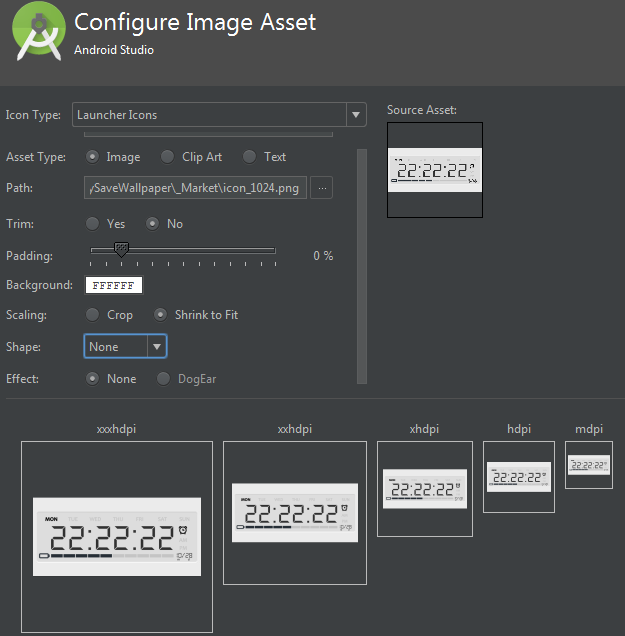
Choose «Image» and image path, Shape – «None».
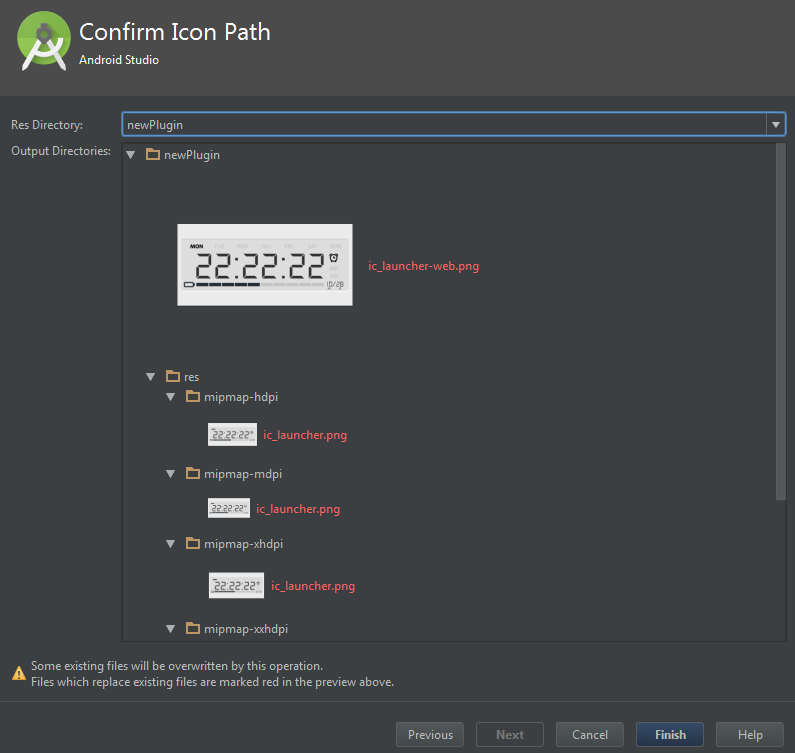
Specify the folder with the resources of the plugin. Choose newPlugin and press Finish.
Project is ready. Be sure to check it on a real device or emulator. The application of the Battery Saving Digital Clocks must be installed on the device. Connect the device to the computer via USB.
The necessary drivers must be installed on the computer and debugging mode must be enabled on the device. You can enable USB debugging on Android by going to Settings> Applications> Development> USB Debugging (set checkbox). On Android 4.2 and greater the debugging mode can be enabled in a different way: go to Settings > About device and tap to “Build number“ 7 times.
Press the green triangle button «Run», choose or create new device and press OK.

The plugin window must be launched.

Click on installed application. On the most of devices the clockface will be opened immediately, on other devices you should run the main application by yourself by going to the live wallpaper chooser, application, its settings, clocks type and choose your clockface.
If the all looks like what you wanted then finally go to Build > Generate signed APK and publish your application on Google Play!
All questions send me on maxlab.code@gmail.com with the “Plugin development” topic.